How To Install Oracle 12C on Amazon Linux In Silent Mode

Before start my story, I need to tell this, I’m not an Oracle guy. But as a DBA I had few situation to install Oracle on Amazon Linux. In many blogs, we can get the steps to install in CentOS and RedHat, but my bad I couldn’t find any blogs for Amazon Linux. After read many blogs I got the procedure to install it, and the more important thing is we can use the same step to Amazon Linux, CentOS and RedHat without any changes. But while follow this process some files are not available to edit in Amazon Linux, so please ignore them.
Install Oracle in Linux #
I have installed Oracle 12C release 1 on CentOS and followed the same step for RedHat and Amazon Linux. You can use X windows as well, but I recommend to user Silent installation which saves more time.
- For this installtion, I used Centos 7.2,
- Server Name ora,
- IP address 10.10.0.1
Download using wget and curl #
Downloading Oracle in linux is a bit tricky. Oracle provides a shell script to download Oracle, but for me, it was taking more time to download, So here is the trick.
Do this in your GUI browser, like chrome or firefox.
- First create an account in oracle and Signin.

- Click here to download oracle for Linux and accept the license.
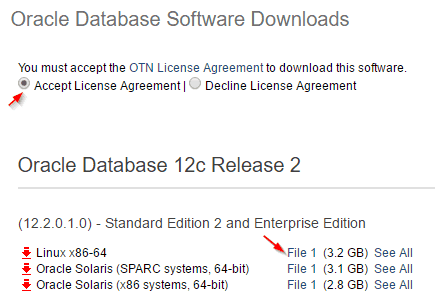
- Click the files you want to download and just pause it copy the link.
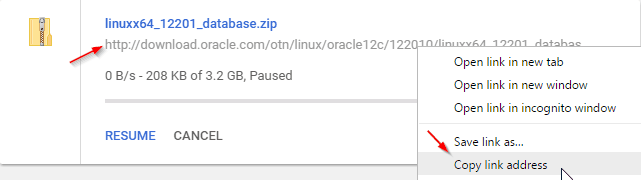
- Now go to your terminal, install wget or curl.
-- For Ubuntu apt-get install wget curl -- For RedHat,Centos and Amazon Linux yum install wget curl - Now type the below command to download via wget.
wget <paste the like> -O filename.zip
Eg: with wget
wget http://download.oracle.com/otn/linux/oracle12c/122010/linuxx64_12201_database.zip?AuthParam=111111111_cb3a26b3a63c89b4405a1e32822d19fc -O file1.zipvi /etc/hosts
127.0.0.1 ora.sqladmin.com ora
10.10.0.1 ora.sqladmin.com oraSet selinux value to permissive #
vi /etc/sysconfig/selinux
SELINUX=permissive
Kernel level parameters #
vi /etc/sysctl.conf

kernel.shmmax = 4294967295
kernel.shmall = 2097152
fs.aio-max-nr = 1048576
fs.file-max = 6815744
kernel.shmmni = 4096
kernel.sem = 250  32000  100  128
net.ipv4.ip_local_port_range = 9000  65500
net.core.rmem_default = 262144
net.core.rmem_max = 4194304
net.core.wmem_default = 262144
net.core.wmem_max = 1048576
Update your Server #
sudo yum install epel-release
sudo yum clean metadata && sudo yum upgrade
Reboot to apply all the the config changes #
sudo rebootInstall pre-requirement packages #
sudo yum -y install binutils.x86_64 compat-libcap1.x86_64 compat-libstdc++-33.x86_64 compat-libstdc++-33.i686 compat-gcc-44 compat-gcc-44-c++ gcc.x86_64 gcc-c++.x86_64 glibc.i686 glibc.x86_64 glibc-devel.i686 glibc-devel.x86_64 ksh.x86_64 libgcc.i686 libgcc.x86_64 libstdc++.i686 libstdc++.x86_64 libstdc++-devel.i686 libstdc++-devel.x86_64 libaio.i686 libaio.x86_64 libaio-devel.i686 libaio-devel.x86_64 libXext.i686 libXext.x86_64 libXtst.i686 libXtst.x86_64 libX11.x86_64 libX11.i686 libXau.x86_64 libXau.i686 libxcb.i686 libxcb.x86_64 libXi.i686 libXi.x86_64 make.x86_64 unixODBC unixODBC-devel sysstat.x86_64

sudo yum -y install binutils-2.* compat-libstdc++-33* elfutils-libelf-0.* elfutils-libelf-devel-* gcc-4.* gcc-c++-4.* glibc-2.* glibc-common-2.* glibc-devel-2.* glibc-headers-2.* ksh-2* libaio-0.* libaio-devel-0.* libgcc-4.* libstdc++-4.* libstdc++-devel-4.* make-3.* sysstat-7.* unixODBC-2.* unixODBC-devel-2.*
Add user and groups for oracle #
sudo groupadd -g 54321 oracle
sudo groupadd -g 54322 dba
sudo groupadd -g 54323 oper
sudo useradd -u 54321 -g oracle -G dba,oper oracle
sudo usermod -a -G wheel oracle
sudo passwd oracle
Disable iptables or configure to allow oracle #
sudo iptables -F
sudo service iptables save
sudo chkconfig iptables on
Create swap file #
sudo dd if=/dev/zero of=/swapfile bs=10M count=70
sudo chmod 600 /swapfile
sudo mkswap /swapfile
sudo swapon /swapfile
Make swap file at startup #
vi /etc/fstab
/swapfile none swap sw 0  0
Create directories for oracle installation #
sudo mkdir -p /ora01/app/oracle/product/12.1.0/db_1
mkdir -p /ora01/app/oracle/distribs
sudo chown -R oracle:oracle /ora01
sudo chmod -R 775 /ora01
ls -l /ora01
Create bash profile file #
vi /home/oracle/.bash_profile
export TMP=/tmp
export ORACLE_HOSTNAME=ora
export ORACLE_UNQNAME=ORA12C
export ORACLE_BASE=/ora01/app/oracle
export ORACLE_HOME=$ORACLE_BASE/product/12.1.0/db_1
export ORACLE_SID=ORA12C
export PATH=$ORACLE_HOME/bin:$PATH
export LD_LIBRARY_PATH=$ORACLE_HOME/lib:$LD_LIBRARY_PATH
export CLASSPATH=ORACLE_HOME/jlib:ORACLE_HOME/rdbms/jlib;
alias cdob='cd ORACLE_BASE'
alias cdoh='cd ORACLE_HOME'
alias tns='cd ORACLE_HOME/network/admin'
alias envo='env | grep ORACLE'
umask 022
envo
Set file limits and file descriptor values #
vi /etc/security/limits.conf
oracle soft nofile 1024
oracle hard nofile 65536
oracle soft nproc 2047
oracle hard nproc 16384
oracle soft stack 10240
oracle hard stack 32768
vi /etc/security/limits.d/20-nproc.conf
-- By default it was set to
* soft nproc 1024
-- We need to change it to.
* - nproc 16384Installation: #
We are doing this installation in three parts.
db_install.rsp– used to install oracle binaries, install/upgrade a database in silent modedbca.rsp– used to install/configure/delete a database in silent modenetca.rsp– used to configure simple network for oracle database in silent mode
db_install file installation #
Move oracle installer to appropriate directory. I have downloaded and extracted Oracle software in /home/ubuntu/database.
mv /home/oracle/database /ora01/app/oracle/distribs
sudo chown -R oracle:oracle /ora01/app/oracle/distribs/database
sudo chmod -R 775 /ora01/app/oracle/distribs/databaseEdit and install db_install.rsp
cp db_install.rsp db_install.rsp.bck

vi /ora01/app/oracle/distribs/database/response/db_install.rsp

oracle.install.responseFileVersion=/oracle/install/rspfmt_dbinstall_response_schema_v12.1.0
oracle.install.option=INSTALL_DB_SWONLY
ORACLE_HOSTNAME=ora
UNIX_GROUP_NAME=oracle
INVENTORY_LOCATION=/ora01/app/oraInventory
SELECTED_LANGUAGES=en
ORACLE_HOME=/ora01/app/oracle/product/12.1.0/db_1
ORACLE_BASE=/ora01/app/oracle
oracle.install.db.InstallEdition=EE
oracle.install.db.DBA_GROUP=oracle
oracle.install.db.OPER_GROUP=oracle
oracle.install.db.BACKUPDBA_GROUP=oracle
oracle.install.db.DGDBA_GROUP=oracle
oracle.install.db.KMDBA_GROUP=oracle
DECLINE_SECURITY_UPDATES=truesource ~/.bash_profilecd /ora01/app/oracle/distribs/database/
./runInstaller -silent -responseFile /ora01/app/oracle/distribs/database/response/db_install.rspsu root
/ora01/app/oraInventory/orainstRoot.sh
/ora01/app/oracle/product/12.1.0/db_1/root.shsource ~/.bash_profile
sqlplus / as sysdbanetca.rsp file installation #
You can edit netca.rsp to set own parameters. I didn’t change anything here. It will configure LISTENER with standard settings.
netca -silent -responseFile /ora01/app/oracle/distribs/database/response/netca.rsplsnrctl statusdbca.rsp file installation #
Here I’m going to install single instance database called ORA12C.
Make the directories for data files
su oracle
mkdir /ora01/app/oracle/oradata
mkdir /ora01/app/oracle/flash_recovery_areavi /ora01/app/oracle/distribs/database/response/dbca.rsp
GDBNAME = "ora_master"
SID = "ORA12C"
TEMPLATENAME = "General_Purpose.dbc"
SYSPASSWORD = "oracle"
SYSTEMPASSWORD = "oracle"
EMCONFIGURATION = "DBEXPRESS"
EMEXPRESSPORT = "5500"
SYSMANPASSWORD = "oracle"
DBSNMPPASSWORD = "oracle"
DATAFILEDESTINATION = /ora01/app/oracle/oradata
RECOVERYAREADESTINATION = /ora01/app/oracle/flash_recovery_area
STORAGETYPE = FS
LISTENERS = "LISTENER"
DATABASETYPE = "OLTP"
AUTOMATICMEMORYMANAGEMENT = "TRUE"
TOTALMEMORY = "1024"Now execute the below command to create the database.
dbca -silent -responseFile /ora01/app/oracle/distribs/database/response/dbca.rspdbca\
-silent\
-createDatabase\
-templateName General_Purpose.dbc\
-gdbName ORA12C\
-pdbadminPassword oracle\
-SysPassword oracle\
-SystemPassword oracle\
-emConfiguration NONE\
-datafileDestination /ora01/app/oracle/oradata\
-asmSysPassword oracle\
-characterSet AL32UTF8\
-totalMemory 6000\
-recoveryAreaDestination /ora01/app/oracle/flash_recovery_area