Migrate 5TB ElasticSearch Cluster In GCP With Disk Snapshot
Migrate 5TB OpenDistro ElasticSearch Cluster from one GCP project to another GCP project with less downtime(30mins) using Disk Snapshots and Images.
We had an OpenDistro ElasticSearch Cluster on GCP and due to some changes on the GCP Organization project structure changes, we had to migrate an Open Distro ElasticSearch Cluster from the old GCP project to a new GCP project. The data size was pretty large. Each node has 5TB of Data. So migrating this cluster using a native snapshot and restore will take a lot of time. This is a small story about using the snapshots to migrate the complete cluster within 30mins downtime to a new GCP project.
Problems with setting up a new cluster: #
- The current production cluster has customized configurations and well-tuned.
- Doing all these changes on a fresh Server is a difficult job.
- Installation and other stuff will eat our time.
- Finally restoring a snapshot its the longest process.
So we decided to move the cluster with Images(for root volume) and Snapshots(ElasticSearch data volume).
Permissions on GCP side: #
- Owner access - You can do everything.
- Or these images and snapshots can be shared with the other project with
compute.imageUserrole.
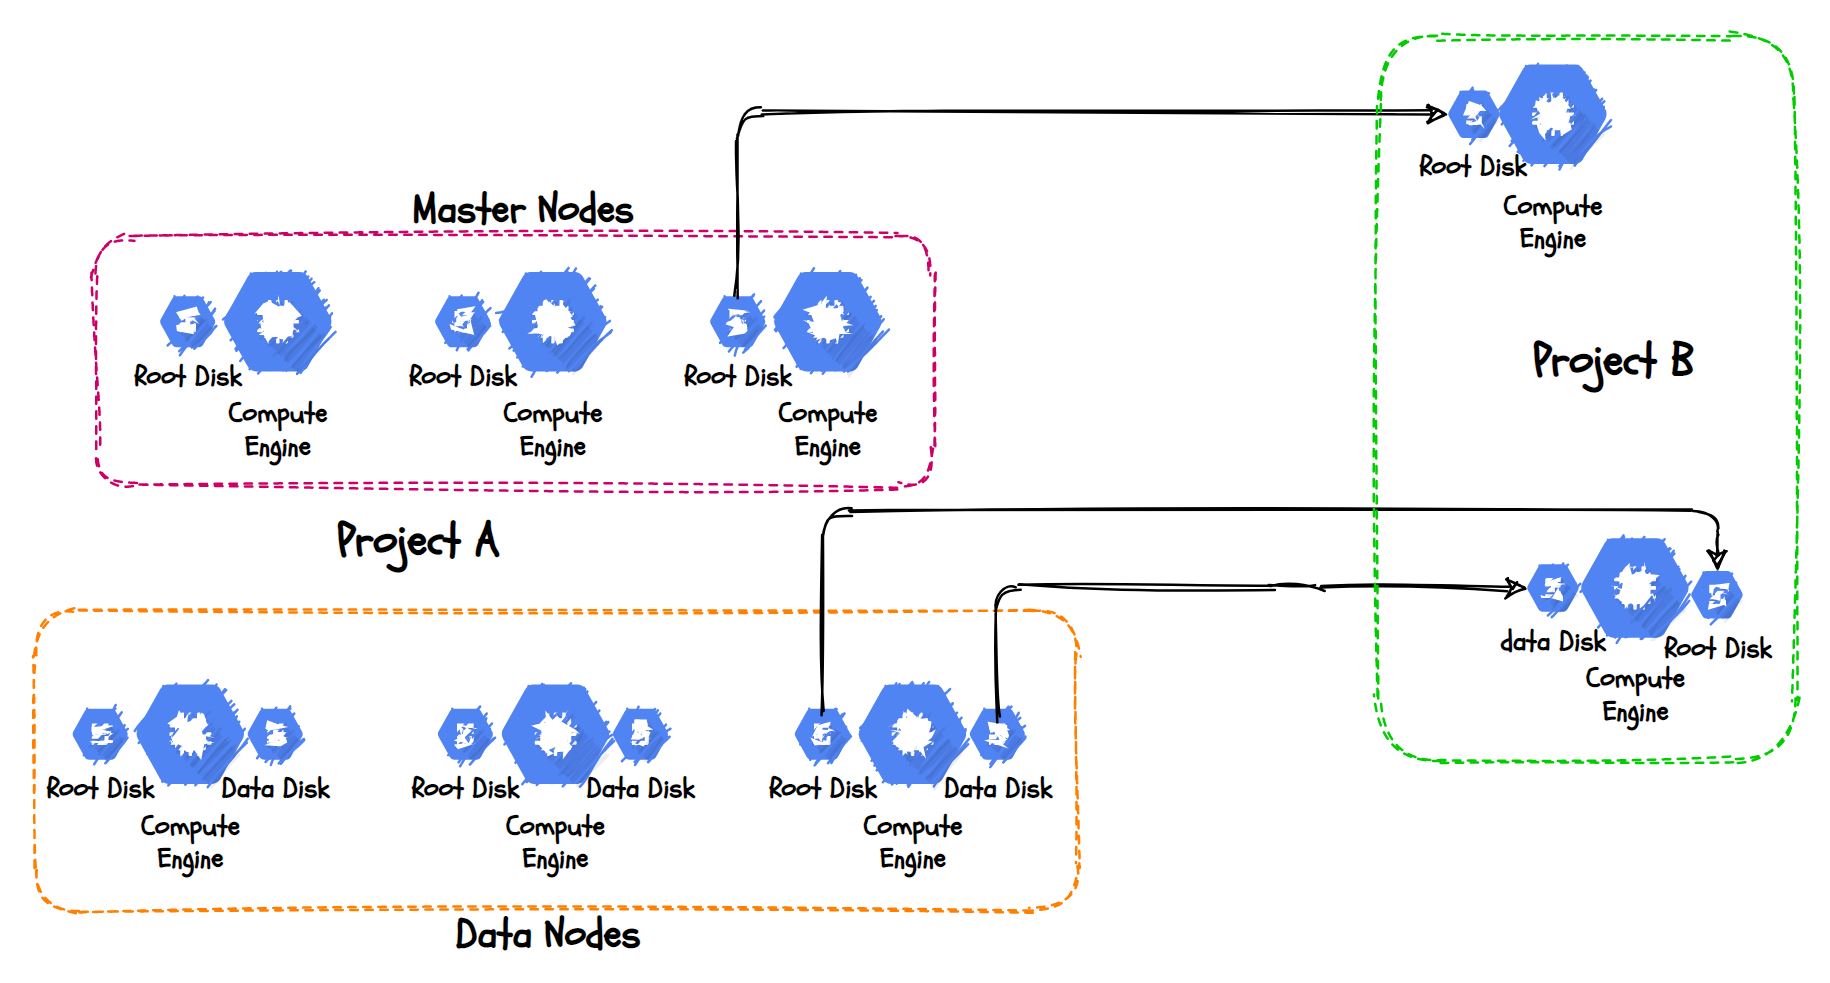
Let’s say the current setup is in projectA and we need to move it to ProjectB. Assign permission to the ProjectB service account from ProjectA.
Replace
123123123with the account ID of ProjectB
-- Run this command on project A
gcloud config set project projectA
gcloud projects add-iam-policy-binding projectA \
    --member serviceAccount:[email protected]  \
    --role roles/compute.imageUser
Stop the writes: #
We want to take the snapshot and generally, the GCP snapshots are not consistent. So it is mandatory to stop the write activities.
Take Image: #
For all the root volumes, we’ll take Image, so it’ll be easy to spin up a new VM from the other project. We can take it without restarting the VM.
Replace
image-namewith the of the Image,disk-name-of-root-volumewith the Root disk name andus-west4-cwith the zone where the source disk is available thenus-west4the region name where the volume is located.
gcloud compute images create image-name \
	--source-disk disk-name-of-root-volume \
	--source-disk-zone us-west4-c \
	--storage-location  us-west4
  --force
Take Snapshot: #
Now for the data disks, we can take a snapshot. Generally for a large disk needs more time to take a snapshot. But GCP snapshots are incremental in nature. So we took a snapshot before this activity. And this time it’ll take the incremental data only. So it’ll be fast.
Replace
us-west4with the region where the volume is located.
gcloud compute disks snapshot data-disk-name \
	--snapshot-names data-disk-1-mig
	--storage-location us-west4
Create Disks from the Snapshots: #
Now let’s create the Disk from the Source snapshot on ProjectB.
Replace
prd-es-datadiskdisk name,pd-ssddisk type like SSD or PD volume,us-west4region for the disk,us-west4-czone for the disk andprojects/projectA/global/snapshots/es-stg-data-newproject-migrationreplaceprojectAwith the source project name anddata-disk-1-migwith the source snapshot name.
gcloud compute disks create prd-es-datadisk \
	--type pd-ssd \
	--region us-west4 \
	--zone us-west4-c
	--source-snapshot projects/projectA/global/snapshots/data-disk-1-mig
Once it’s created, then we are ready to launch the new VM for the Cluster.
Create the VM from the image: #
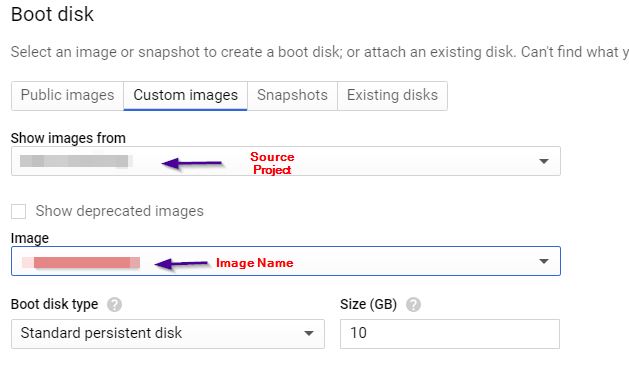
We already granted the ImageUser role to the ProjectB, and if you are the project owner or editor while launching the VM, under the boot disk selection, you can see Custom Images. There you can choose the source project and select the image that we created for the migration.
I had 3 master nodes, so I have to launch 3 VMs with these steps. No additional disks for the Master node. So I just added other information like networks tag, VPC and etc.
For the Data Nodes, we have to follow the same steps for launching the VM, but under the Disks section select Attach Existing Disk. You can pick the disk that we created from the Source snapshot.
Note: The VM and the Disk must be in the same zone, so keep this in mind while creating the disk and VM.
That’s all, spin up all the Data nodes and master nodes. Wait for the booting process to complete.
ElasticSearch config changes: #
The IP addresses are different in the new project, so the cluster will not come online. We have to make the following changes.
Note: these config settings are from my cluster. You can change as per your cluster config.
node.name: new-vm-name
network.host: new-vm-ip
discovery.seed_hosts: ["a bunch of new IP addresses "]
cluster.initial_master_nodes: ["a bunch of new IP addresses "]
Optional Change: Renaming the ElasticSearch Cluster Name
cluster.name: new-cluster-name
Restart the elasticsearch service to make these changes. Right now the cluster says the OpenDistro Security Not Initialized for any requests.
Open Distro Security not initialized (SG11).
It’s due to the network and node name changes. So we have to reinitialize the OpenDisto security settings. Make the sure cluster state should be in YELLOW not in RED.
Replace
kirk.pemandkirk-key.pemwith your client certificates.
/usr/share/elasticsearch/plugins/opendistro_security/tools/securityadmin.sh \
   -cd /usr/share/elasticsearch/plugins/opendistro_security/securityconfig/ \
   -icl -nhnv -cacert /etc/elasticsearch/root-ca.pem  \
   -cert /etc/elasticsearch/kirk.pem  \
   -key /etc/elasticsearch/kirk-key.pem \
   -h localhost
Then it’ll return some bunch of messages after that the cluster will be in the Green state.
Conclusion: #
This is a shortcut to migrate a large cluster, but it is not only the solution, also before doing this make sure you tested everything and do it on production.