MySQL PITR The Fastest Way With DevOps
Point In Time Recovery - is a nightmare for DBAs if the MySQL clusters are self managed. It was 10PM, after had my dinner I was simply watching some shows in YouTube. And my phone was ringing, the customer on other side. Due to some bad queries, one of the main table get updated without where clause. Then suddenly everyone joined the call and asking me to bring the data back. That day it took 6 to 8 Hours to bring the data. Yes, every DBAs will do one or two biggest mistakes. In my carrier I would say this was that day. So here is my MySQL PITR the fastest way with DevOps.
Where I failed in this DR setup? #
- PITR starts with last full backup + binlogs
- I missed in my backup script to add
--master-data, So I don’t know how to start applying binlogs. - No Delay replica. I got the call within 10mins when the data has been messed up. But all of my replicas are real time sync. Its affected all of them.
- And the effort, launching new server, Install MySQL and configure MySQL parameters. It took 15-20mins.
- Restoring the logical backup of a pretty huge database. Its few hours.
- Then copy binlogs(or read binlog from remote server), get the start position and find the stop position and execute them on DR server. Again the effort matters here.
After that incident, I compared my scenario with AWS RDS. How simple is that? Just few clicks it’ll provision an instance and apply the binlogs. But this is also fail in one case. What happen if need to restore till a position. Its not possible. You have option for select the time not binlog position. But anyhow I like this option RDS(in CloudSQL it sucks). Then I build this Simplified PITR in one click with the help of RunDeck.
DR setup: #
I done modification in my DR site. My entire Infra in GCP and backup files are sync with GCS bucket.
- Setup a delay replica for 15mins.
- Replaced logical backup with Percona XtraBackup.
- Image(in AWS terms its AMI) is ready with MySQL and Optimized MySQL parameters.
- Finally a RunDeck Job which will do this magic.
Before you start implementing this solution, you need to setup the below things.
- Setup a backup job with Percona Xtrabackup along with incremental backups. (Naming conversion must be same as I mentioned in that blog).
- Setup Rundeck and add your DR server in RunDeck.(Read my rundeck kickstart series)
- Make your DR server to pull the binlog files from Master. (You can use read binlog from remote server, SCP or something like that).
Percona XtraBackup: #
My PITR depends on my xtrabackup. I have configured my backup job with
- 12.00AM full backup (runtime 15mins)
- Every 1Hr incremental Backup(run time 10mins)
The backup process will take 10-15mins to complete. If I want to restore till 1.04AM, then I should restore the FULL Backup(12AM), but this 1AM incremental backup is still going on. I should not use this backup to perform PITR. Then what should we do?
- Restore 12AM full backup
- Apply binlogs after 12AM to 1.04AM
Then we don’t need to bother about the on going incremental backup.
Read Here :Automation Script For Percona Xtrabackup FULL/Incremental
What Backup files needs to Restore? #
Now in my scripting, based on the above scenario, I have added a condition for which backup files are needs to be restored. For safer side I considered 15mins as my backup complete time.
1. If hour !=00(not equal to 12AM), then check if minutes >15. Now I can use FULL backup + last Incremental backups.
  ex: 2019-03-04 02:20:30
hour =02 (!=00)
minutes =20 (>15)
Restore: FULL Backup + 01 Inc + 02 Inc
2. If hour !=00(not equal to 12AM), then check if minutes <15. Then the incremental backup is going on this time. So we should avoid this current Inc backup and use FULL Backup alone + Current Hour -1 Inc backup
  ex: 2019-03-04 05:10:30
hour=01 (!=0)
minutes=10 (<15)
Restore: FULL backup + Inc1 to Inc4
3. If hour=00 and minute<15, then this time FULL Backup process is going on, so we should not use this backup. In this case we should sync yesterday’s FULL backup + Yesterday’s Inc 1 to Inc 23.
So this is my IF condition to select which file needs to sync.
d='2019-03-04 20:42:53"
s_d=`echo $d | awk -F ' ' '{print $1}'`
s_h=`echo $d | awk -F ' ' '{print $2}'| awk -F ':' '{print $1}'`
s_m=`echo $d | awk -F ' ' '{print $2}' | awk -F ':' '{print $2}'`

if [ $s_h -ne 00 ]
then if [ $s_m -gt 15 ]
then
echo "sync FULL + actual hour"
else if [ $s_h -eq 01 ]
then
echo "sync actual full only"
else
echo "sync FULL + hour -1"
fi
fi
else if [ $s_m -gt 15 ]
then
echo "sync actual full only"
else
echo "last day full + 23inc"
fi
fi
Transfer.sh: #
For my database infra, I have configured transfer.sh file sharing. because if your MySQL is down, then we should not use read-from-remote-server. SCP also needs shell based access and we configured SSH session recording with 2FA, so SCP will not work. Its not a big deal you can read how I configured Transfer.sh for my internal network from the below link.
CloudOps At Scale: Secure access patterns using Bastion Host and Transfer.Sh
Again its your choice that how to bring Binlog files to DR Server.
Get the Binlogs: #
Now its another question, What/How many binlog files do I need to copy from Master?
Its actually from your last backup type(Full or Inc) to next backup hour.
XtraBackup will have the info about the binlog file name and position. For this PITR, we should restore FULL Backup + Inc1 to Inc5. Once we executed the xtrabackup prepare command(restore), the xtrabackup-binlog_info will contains the exact binlog file and position during that backup. So we need to copy from that backup to what are all other files created within our PITR time.
Step Involved: #
- Once we decided the time, Download the backup files from GCS bucket.
- Restore the XtraBackup.
- Point MySQL DataDir to Restored Xtrabackup directory.
- Get the necessary binlog files from Master Server.
- Decode the Binlog files using
mysqlbinlog utility. - Restore the decoded binlog file.
On DR Server: #
Before run this job, please make sure the below things:
- Master/DR server are added to RunDeck Server.
- RunDeck user on DR and Master server should have root access
- Install
wgeton DR server. - RunDeck user’s Private Key must be located on DR Servers RunDeck users home directory (
/home/rundeck/.ssh/id_rsa) This is for login to Master sever without password and export the Binlog files. - I used Transfer.sh, so I have created an alias to run curl upload command by calling
transfer filename. So you can use transfer.sh or bring your own copy mechanism.
If you are not using transfer.sh then ignore this step.
On Master: #
Replace 10.10.10.10 with your transfer.sh server IP.
vi /home/rundeck/.bashrc
transfer() {
 curl --progress-bar --upload-file "$1" http://10.10.10.10/$(basename $1) |
tee /dev/null;
}
alias transfer=transfer
Save and close.
Add rundeck user to mysql group.
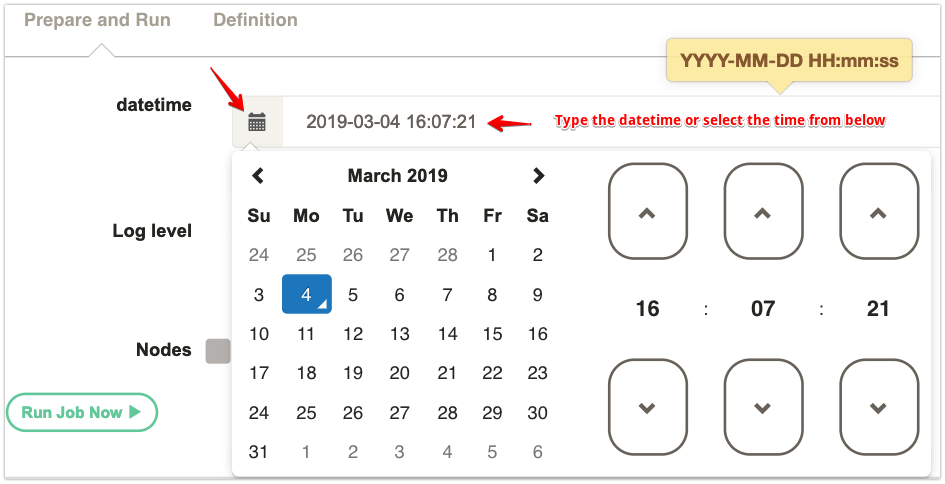
usermod -aG mysql rundeck Lets create the RunDeck Job: #
- Go to RunDeck –> Jobs –> New Job
- JobName –> Point In Time Recovery
- In the Options section add as Option.
- Option Name/Option Label –>
datetime - Under the input type, select
DATE - Date Format:
YYYY-MM-DD HH:mm:ss - Required: Yes
Under the Workflow –> Node steps, click on script. Copy and Paste the below shell script.
Step 1: Download Backup files from GCS #
d='@option.datetime@'
echo $d
s_d=`echo $d | awk -F ' ' '{print $1}'`
s_h=`echo $d | awk -F ' ' '{print $2}'| awk -F ':' '{print $1}'`
s_m=`echo $d | awk -F ' ' '{print $2}' | awk -F ':' '{print $2}'`

if [ $s_h -ne 00 ]
then if [ $s_m -gt 15 ]
then
echo "sync FULL + actual hour"
mkdir -p /mysqldata/FULL
gsutil -m rsync -r gs://xtrabackup/$s_d/FULL/ /mysqldata/FULL/
for i in $(seq  1 $s_h);
do
echo "inc"$i
mkdir -p /mysqldata/inc$i
gsutil -m rsync -r gs://xtrabackup/$s_d/inc$i/ /mysqldata/inc$i/
done
else if [ $s_h -eq 01 ]
then
echo "sync actual full only"
mkdir -p /mysqldata/FULL
gsutil -m rsync -r gs://xtrabackup/$s_d/FULL/ /mysqldata/FULL/
else echo "sunc FULL + hour -1"
inc=$(expr $s_h - 1)
mkdir -p /mysqldata/FULL
gsutil -m rsync -r gs://xtrabackup/$s_d/FULL/ /mysqldata/FULL/
for i in $(seq  1 $inc);
do
mkdir -p /mysqldata/inc$i
echo "inc"$i
gsutil -m rsync -r gs://xtrabackup/$s_d/inc$i/ /mysqldata/inc$i/
done
fi
fi
else if [ $s_m -gt 15 ]
then
echo "sync actual full only"
mkdir -p /mysqldata/FULL
gsutil -m rsync -r gs://xtrabackup/$s_d/FULL/ /mysqldata/FULL/
else
echo "last day full + 23inc"
yesterday=`date -d "$s_d -1 days" +%Y-%m-%d`
mkdir -p /mysqldata/FULL
gsutil -m rsync -r gs://xtrabackup/$yesterday/FULL/ /mysqldata/FULL/
for i in $(seq  1 23);
do
mkdir -p /mysqldata/inc$i
echo "inc"$i
gsutil -m rsync -r gs://xtrabackup/$yesterday/inc$i/ /mysqldata/inc$i/
done
fi
fi
If you are using AWS, Azure or FTP, then replace this gsutil -m rsync -r gs://xtrabackup/$s_d/FULL/ /mysqldata/FULL/ line with your commands.
Also replace /mysqldata for where you need to download Backup files.
Step 2: Restore the Xtrabackup #
BACKUP_DIR='/mysqldata'

echo `date '+%Y-%m-%d %H:%M:%S:%s'`": Decompressing the FULL backup" >> $BACKUP_DIR/xtrabackup-restore.log
xtrabackup --decompress --remove-original --parallel=30 --target-dir=$BACKUP_DIR/FULL
echo `date '+%Y-%m-%d %H:%M:%S:%s'`": Decompressing Done !!!" >> $BACKUP_DIR/xtrabackup-restore.log

echo `date '+%Y-%m-%d %H:%M:%S:%s'`": Prepareing FULL Backup ..." >> $BACKUP_DIR/xtrabackup-restore.log
xtrabackup --prepare  --apply-log-only --target-dir=$BACKUP_DIR/FULL
echo `date '+%Y-%m-%d %H:%M:%S:%s'`": FULL Backup Preparation Done!!!" >> $BACKUP_DIR/xtrabackup-restore.log

 P=1
 while [ -d $BACKUP_DIR/inc$P ] && [ -d $BACKUP_DIR/inc$(($P+1)) ]
 do
       echo `date '+%Y-%m-%d %H:%M:%S:%s'`": Decompressing incremental:$P" >> $BACKUP_DIR/xtrabackup-restore.log
       xtrabackup --decompress --remove-original --parallel=30 --target-dir=$BACKUP_DIR/inc$P
       echo `date '+%Y-%m-%d %H:%M:%S:%s'`": Decompressing incremental:$P Done !!!" >> $BACKUP_DIR/xtrabackup-restore.log

       echo `date '+%Y-%m-%d %H:%M:%S:%s'`": Prepareing incremental:$P"  >> $BACKUP_DIR/xtrabackup-restore.log
       xtrabackup --prepare --apply-log-only --target-dir=$BACKUP_DIR/FULL --incremental-dir=$BACKUP_DIR/inc$P
       echo `date '+%Y-%m-%d %H:%M:%S:%s'`": incremental:$P Preparation Done!!!" >> $BACKUP_DIR/xtrabackup-restore.log
       P=$(($P+1))
 done

 if [ -d $BACKUP_DIR/inc$P ]
 then
     echo `date '+%Y-%m-%d %H:%M:%S:%s'`": Decompressing the last incremental:$P" >> $BACKUP_DIR/xtrabackup-restore.log
     xtrabackup --decompress --remove-original --parallel=30 --target-dir=$BACKUP_DIR/inc$P
     echo `date '+%Y-%m-%d %H:%M:%S:%s'`": Decompressing the last incremental:$P Done !!!" >> $BACKUP_DIR/xtrabackup-restore.log

     echo `date '+%Y-%m-%d %H:%M:%S:%s'`": Prepareing the last incremental:$P"  >> $BACKUP_DIR/xtrabackup-restore.log
     xtrabackup --prepare --target-dir=$BACKUP_DIR/FULL --incremental-dir=$BACKUP_DIR/inc$P
     echo `date '+%Y-%m-%d %H:%M:%S:%s'`": Last incremental:$P Preparation Done!!!" >> $BACKUP_DIR/xtrabackup-restore.log
 fi
BACKUP_DIR='/mysqldata' - Replace /mysqldata with your location on DR server where is you backups are downloaded from the step 1.
I have 40 core CPU, so I used 30 parallel threads. You can modify based on you DR server’s CPU in --parallel=30
Step 3: Start MySQL with Restored Data #
BACKUP_DIR='/mysqldata'
DATADIR='/mysqldata/data'
sudo service mysql stop
sudo mv $BACKUP_DIR/FULL $BACKUP_DIR/data
sudo sed -i.bak "s|.*datadir.*|datadir=$DATADIR|" /etc/my.cnf
sudo semanage fcontext -a -t mysqld_db_t "/mysqldata/data(/.*)?"
sudo restorecon -R -v /mysqldata/data
sudo chown -R mysql:mysql /mysqldata/data
sudo chmod 750 /mysqldata/data
sudo service mysql start
Again /mysqldata replace this with your backup file location. And the Restored backup will be in the directory called FULL. Im renaming it to data.
Step 4: Download binlog files from Master: #
d='@option.datetime@'
DATADIR='/mysqldata/data'
[ -e /tmp/out  ] && rm /tmp/out
start_binlog=`head -n 1 $DATADIR/xtrabackup_binlog_info  | awk -F ' ' '{print $1}'`
stop_binlog=`ssh 10.10.10.40 "find /mysql-binlog/ -type f  -newermt \"$d\"  -exec basename {} \;  | sort | head -1"`
files=$(ssh 10.10.10.40 "seq -w `echo $start_binlog | awk -F'.' '{print $2}'` `echo $stop_binlog | awk -F'.' '{print $2}'`")
for x in `echo $files`; do  ssh 10.10.10.40 "transfer /mysql-binlog/mysql-bin.$x" ; done >> /tmp/out
binlogfiles=`perl -pe 's#(?<=.)(?=http://)#\n#g' /tmp/out`
for x in `echo $binlogfiles`; do wget -P /mysqldata/binlogdump $x ; done- Replace
/mysqldata/datawith your data directory of mysql. - Replace
10.10.10.40with your master server IP. - Replace
/mysql-binlog/your master server’s binlog location. transfer /mysql-binlog/mysql-bin.$xthis command will run the transfer.sh alias and upload the binlog file to transfer.sh serve. If you want to use your own copy process then replacetransferand/mysql-binlog/location of binlog location. And$xis the files. So don’t replace that./mysqldata/binlogdumplocation on the DR server to download binlog files
Step 5: Decode the Binlog files: #
d='@option.datetime@'
DATADIR='/mysqldata/data'
mkdir -p /mysqldata/binlogdump
binlogfilename=`head -n 1 $DATADIR/xtrabackup_binlog_info  | awk -F ' ' '{print $1}'`
binlogposition=`head -n 1 $DATADIR/xtrabackup_binlog_info  | awk -F ' ' '{print $2}'`
files=`ls /mysqldata/binlogdump/`
cd /mysqldata/binlogdump
mysqlbinlog -d Eztaxi --start-position="${binlogposition}" --stop-datetime="${d}" ${files} --disable-log-bin > mysqldata-delta.sql/mysqldata/datareplace with your data directory of MySQL./mysqldata/binlogdumpDownloaded binlog file location.
Step 6: Restore the Binlog file to MySQL: #
mysql -u root -p'password' < /mysqldata/binlogdump/mysqldata-delta.sql p'password'Replace with your MySQL root password. You can use Parameterized password in Rundeck. See here.'/mysqldata/binlogdump/location of the decoded binlog file.
Steps are done.
Now on Matched Nodes select the DR server and click on Create button.
Trigger the PITR: #
Click on the Date Picker Icon and select the date and time for your PITR.
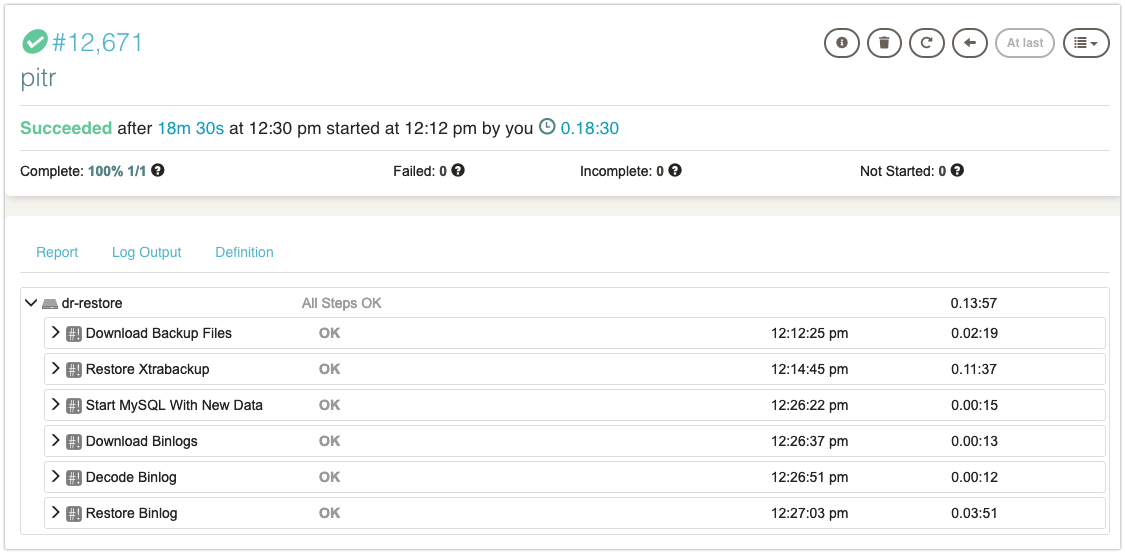
Now click on Run Job Now button and go for a Cup of Coffee.
Here is my job execution has been done in 18mins.
Further improvements and development: #
- In my case, I have my DR server ready with MySQL installed. (as an Image). Before trigger this job, I’ll launch a VM with this image and validate the connectivity between Rundeck and GCS bucket. Im planning to use Terraform template which is also a part of this RunDeck job.
- My complete setup is in GCP, you can perform the same on AWS, Azure or even On-Prem and comment below how it goes.
- I have hardcoded all of mysql data directory, binlog location and everything. If you have enough time, use Options in Rundeck to get these things from an Input during the job execution.
- finally, this is also same as RDS PITR, I never gave option for restore binlog till this position. But we can achieve this on Step 5, just add a variable called position and give your position number. You can use Options to get this value as an Input. and replace
--stop-datetime="${d}"with--stop-position="${pos}".
If you have any difficulties in understanding the steps and scripts, please comment below.
Want to learn more basics of RunDeck Setup? here you go.
Happy Disaster Recovery and PITR :)